
1. ভূমিকা
This manual provides instructions for the safe and effective use of the Sealey MM19 Digital Multimeter. The MM19 is a general-purpose multimeter designed for measuring various electrical parameters, including AC and DC voltage, DC current, resistance, audible continuity, and diode/transistor verification. Please read this manual thoroughly before operation and retain it for future reference.
2. নিরাপত্তা তথ্য
Always observe basic safety precautions when using electrical test equipment to reduce the risk of fire, electric shock, or personal injury. This device complies with IEC 1010 and CE CAT II safety standards.
- সর্বোচ্চ ইনপুট সীমা অতিক্রম করবেন না for any function. Refer to the specifications section for details.
- ভলিউম প্রয়োগ করবেন নাtage to the meter when the rotary switch is set to Resistance (Ω), Diode, Continuity, or Current (A) functions.
- ভলিউমের সাথে কাজ করার সময় সতর্কতা অবলম্বন করুনtag30V AC RMS, 42V পিক, অথবা 60V DC এর উপরে। এই ভলিউমtages একটি শক বিপদ জাহির.
- Ensure the test leads are in good condition, without cracked or broken insulation.
- Always connect the common (COM) test lead first and disconnect it last.
- Disconnect power to the circuit under test before measuring resistance or continuity.
- অবিলম্বে ব্যাটারি প্রতিস্থাপন যখন ব্যাটারির সূচকটি সঠিক রিডিং নিশ্চিত করার জন্য কম প্রদর্শিত হয়।
3. পণ্য শেষview
The Sealey MM19 Digital Multimeter features a clear LCD display, a central rotary switch for function selection, and input jacks for test leads.
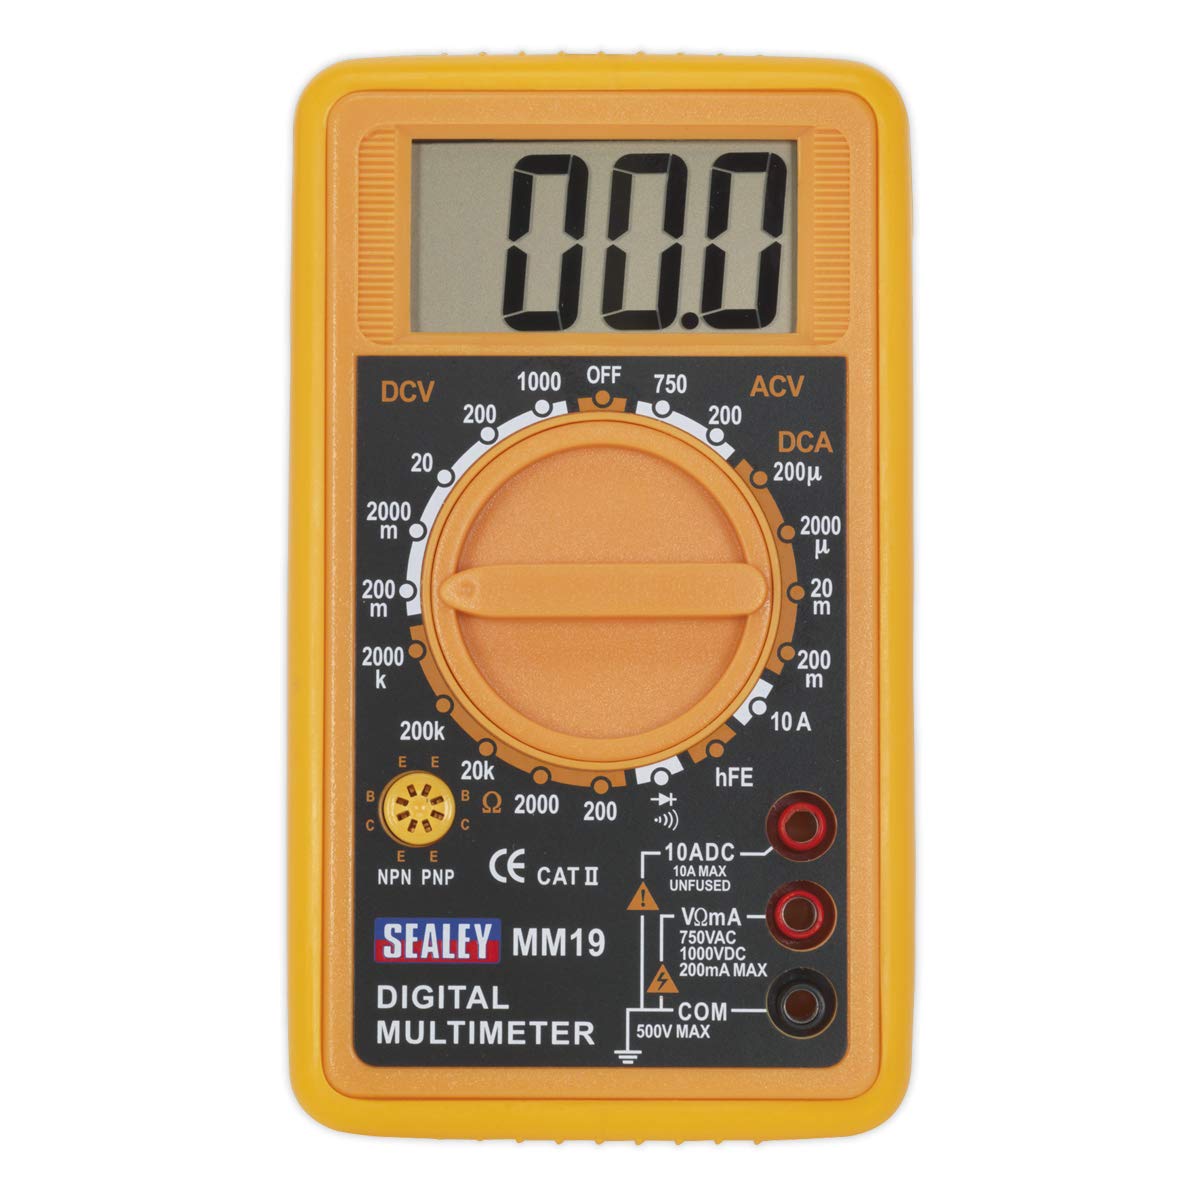
The Sealey MM19 Digital Multimeter, shown with its yellow casing, large LCD display, rotary function switch, and red and black test leads connected to the input jacks.
উপাদান:
- এলসিডি ডিসপ্লে: Large (46 x 25mm) digital display for reading measurements.
- ঘূর্ণমান সুইচ: পছন্দসই পরিমাপ ফাংশন এবং পরিসর নির্বাচন করতে ব্যবহৃত হয়।
- VΩmA Input Jack: ভলিউমের জন্যtage, resistance, and current measurements up to 200mA.
- 10ADC Input Jack: For high current measurements up to 10A DC (unfused).
- COM ইনপুট জ্যাক: সকল পরিমাপের জন্য সাধারণ (ঋণাত্মক) ইনপুট।
- hFE সকেট: For transistor (NPN/PNP) testing.
- টেস্ট লিড: Red (positive) and Black (negative) leads for connecting to circuits.
4. সেটআপ
4.1. ব্যাটারি ইনস্টলেশন
The Sealey MM19 Multimeter requires a 9V battery for operation. If the display does not illuminate or shows a low battery indicator, the battery needs to be installed or replaced.
- মাল্টিমিটারটি বন্ধ আছে কিনা তা নিশ্চিত করুন।
- ইউনিটের পিছনে ব্যাটারি কম্পার্টমেন্ট কভারটি সনাক্ত করুন।
- কভারটি সুরক্ষিত করার জন্য স্ক্রু(গুলি) খুলে সাবধানে তুলে ফেলুন।
- Connect a new 9V battery to the battery clips, observing correct polarity.
- ব্যাটারিটি বগির ভিতরে রাখুন এবং কভারটি প্রতিস্থাপন করুন, স্ক্রু(গুলি) দিয়ে এটি সুরক্ষিত করুন।
৩.২. টেস্ট লিড সংযুক্ত করা
The multimeter is supplied with a pair of test leads (red and black).
- ঢোকান কালো পরীক্ষার সীসা মধ্যে COM (সাধারণ) ইনপুট জ্যাক।
- বেশিরভাগ পরিমাপের জন্য (খণ্ডtage, resistance, low current), insert the লাল পরীক্ষার সীসা মধ্যে VΩmA ইনপুট জ্যাক।
- For high DC current measurements (up to 10A), insert the লাল পরীক্ষার সীসা মধ্যে 10ADC ইনপুট জ্যাক।
5. অপারেটিং নির্দেশাবলী
To operate the multimeter, select the desired function and range using the rotary switch.
৫.২। ডিসি ভলিউম পরিমাপtage (DCV)
- Insert the red lead into the VΩmA jack and the black lead into the COM jack.
- Set the rotary switch to the desired DCV range (e.g., 200m, 2000m, 20, 200, 1000). Start with the highest range if the voltage অজানা।
- পরিমাপ করা উপাদান বা সার্কিট জুড়ে পরীক্ষার লিডগুলি সংযুক্ত করুন।
- ভলিউম পড়ুনtagLCD ডিসপ্লেতে e মান।
5.2. এসি ভলিউম পরিমাপtage (ACV)
- Insert the red lead into the VΩmA jack and the black lead into the COM jack.
- Set the rotary switch to the desired ACV range (e.g., 200, 750). Start with the highest range if the voltage অজানা।
- পরিমাপ করা উপাদান বা সার্কিট জুড়ে পরীক্ষার লিডগুলি সংযুক্ত করুন।
- ভলিউম পড়ুনtagLCD ডিসপ্লেতে e মান।
৩. ডিসি কারেন্ট (ডিসিএ) পরিমাপ করা
- ২০০ এমএ পর্যন্ত স্রোতের জন্য: Insert the red lead into the VΩmA jack and the black lead into the COM jack.
- 10A পর্যন্ত স্রোতের জন্য: Insert the red lead into the 10ADC jack and the black lead into the COM jack.
- Set the rotary switch to the desired DCA range (e.g., 200μ, 2000μ, 20m, 200m, 10A). Start with the highest range if the current is unknown.
- সার্কিটে পাওয়ার বন্ধ করুন। Open the circuit where the current is to be measured.
- মাল্টিমিটারটিকে সার্কিটের সাথে সিরিজে সংযুক্ত করুন।
- সার্কিটে পাওয়ার প্রয়োগ করুন এবং LCD ডিসপ্লেতে বর্তমান মান পড়ুন।
৫.৫. প্রতিরোধ পরিমাপ (Ω)
- Insert the red lead into the VΩmA jack and the black lead into the COM jack.
- Set the rotary switch to the desired Resistance (Ω) range (e.g., 200, 2000, 20k, 200k, 2000k).
- পরীক্ষাধীন সার্কিটটি ডি-এনার্জাইজড আছে কিনা তা নিশ্চিত করুন।
- পরিমাপ করা উপাদানের উপর পরীক্ষার লিডগুলি সংযুক্ত করুন।
- LCD ডিসপ্লেতে রেজিস্ট্যান্স মান পড়ুন।
৬.৭। শ্রবণযোগ্য ধারাবাহিকতা পরীক্ষা
- Insert the red lead into the VΩmA jack and the black lead into the COM jack.
- Set the rotary switch to the continuity symbol (speaker icon).
- পরীক্ষাধীন সার্কিটটি ডি-এনার্জাইজড আছে কিনা তা নিশ্চিত করুন।
- কম্পোনেন্ট বা তারের উপর পরীক্ষার লিডগুলি সংযুক্ত করুন।
- If continuity exists (low resistance), the meter will emit an audible tone. The display will show the resistance value.
5.6. Diode/Transistor Verification Mode (hFE)
- Insert the red lead into the VΩmA jack and the black lead into the COM jack for diode testing.
- Set the rotary switch to the diode symbol.
- লাল লিডটি অ্যানোডের সাথে এবং কালো লিডটি ডায়োডের ক্যাথোডের সাথে সংযুক্ত করুন। ডিসপ্লেটি ফরোয়ার্ড ভলিউম দেখাবেtage ড্রপ। লিডগুলি উল্টে দিন; একটি ভালো ডায়োডের জন্য ডিসপ্লেতে 'OL' (ওপেন লুপ) দেখানো উচিত।
- For transistor hFE measurement, insert the transistor leads (Emitter, Base, Collector) into the appropriate sockets (E, B, C) in the hFE test socket, ensuring correct NPN or PNP type selection.
- LCD ডিসপ্লেতে hFE মানটি পড়ুন।
6. রক্ষণাবেক্ষণ
6.1. পরিষ্কার করা
মিটারটি মুছুন casinবিজ্ঞাপন সহ gamp কাপড় এবং হালকা ডিটারজেন্ট ব্যবহার করুন। ঘষিয়া তুলিয়া ফেলিতে সক্ষম দ্রাবক বা দ্রাবক ব্যবহার করবেন না। ব্যবহারের আগে নিশ্চিত করুন যে মিটারটি সম্পূর্ণ শুষ্ক।
6.2. ব্যাটারি প্রতিস্থাপন
Refer to Section 4.1 for battery installation instructions. Replace the 9V battery when the low battery indicator appears on the display to maintain measurement accuracy.
7. সমস্যা সমাধান
- কোন চিত্র নেই: Check battery installation and ensure the battery has sufficient charge.
- ডিসপ্লেতে 'OL' অথবা '1': This usually indicates an over-range condition or an open circuit. Select a higher range or check connections.
- ভুল পড়া: Ensure the correct function and range are selected. Check test lead connections and battery condition.
- No Continuity Tone: Verify the circuit is de-energized and the leads are making good contact.
8. স্পেসিফিকেশন
| প্যারামিটার | মান |
|---|---|
| ব্র্যান্ড | সিলি |
| মডেল নম্বর | MM19 |
| শক্তির উৎস | ব্যাটারি চালিত (২৪ ভোল্ট) |
| প্রদর্শন | Digital LCD (46 x 25mm) |
| ডিসি ভলিউমtage (DCV) | ২০০ এমভি, ২০০০ এমভি, ২০ ভি, ২০০ ভি, ৬০০ ভি |
| এসি ভলিউমtage (ACV) | 200V, 750V |
| ডিসি কারেন্ট (ডিসিএ) | 200µA, 2000µA, 20mA, 200mA, 10A |
| প্রতিরোধ (Ω) | 200Ω, 2000Ω, 20kΩ, 200kΩ, 2000kΩ |
| ধারাবাহিকতা | Audible tone below approx. 30Ω |
| ডায়োড পরীক্ষা | ফরোয়ার্ড ভলিউমtage drop display |
| ট্রানজিস্টর পরীক্ষা | hFE (NPN/PNP) |
| নিরাপত্তা রেটিং | CE CAT II, IEC 1010 |
| মাত্রা (L x W x H) | 1.93 x 4.21 x 6.06 ইঞ্চি |
| আইটেম ওজন | 9.5 আউন্স (0.27 কিলোগ্রাম) |
9. ওয়্যারেন্টি এবং সমর্থন
For warranty information or technical support, please refer to the documentation provided with your purchase or contact Sealey customer service directly. Keep your proof of purchase for any warranty claims.