![]()

ABX00087 UNO R4 ওয়াইফাই ডেভেলপমেন্ট বোর্ড
Cricket Shot Recognition using Arduino UNO R4 WiFi + ADXL345 + Edge
আবেগ
This document provides a complete workflow for building a cricket shot recognition system using Arduino UNO R4 WiFi with an ADXL345 accelerometer and Edge Impulse Studio. The project involves collecting accelerometer data, training a machine learning model, and deploying the trained model back to the Arduino for real-time shot classification.
Cricket shots considered in this project:
– Cover Drive
– Straight Drive
– Pull Shot
ধাপ 1: হার্ডওয়্যারের প্রয়োজনীয়তা
– Arduino UNO R4 WiFi
– ADXL345 Accelerometer (I2C)
– Jumper wires
– Breadboard (optional)
- ইউএসবি টাইপ-সি কেবল
ধাপ 2: সফ্টওয়্যার প্রয়োজনীয়তা
– Arduino IDE (latest)
– Edge Impulse Studio account (free)
– Edge Impulse CLI tools (Node.js required)
– Adafruit ADXL345 library
Step 3: Wiring the ADXL345
Connect the ADXL345 sensor to the Arduino UNO R4 WiFi as follows:
ভিসিসি → ৩.৩ ভোল্ট
GND → GND
SDA → SDA (A4)
SCL → SCL (A5)
CS → 3.3V (optional, for I2C mode)
SDO → floating or GND
Step 4: Make IDE Sensor Ready
Arduino IDE তে সেন্সর লাইব্রেরি কিভাবে ইনস্টল করবেন?
Arduino IDE খুলুন
Open Tools → Manage Libraries… and install: Adafruit ADXL345 Unified Adafruit Unified Sensor
(If you have LSM6DSO or MPU6050 instead: install SparkFun LSM6DSO , Adafruit LSM6DS or MPU6050 accordingly.)
Step 5: Arduino Sketch for Data Collection
Upload this sketch to your Arduino UNO R4 WiFi. It streams accelerometer data in CSV format (x,y,z) at ~18 Hz for Edge Impulse.
#অন্তর্ভুক্ত
#include <Adafruit_ADXL345_U.h>
Adafruit_ADXL345_Unified accel =
Adafruit_ADXL345_Unified(12345);
অকার্যকর সেটআপ() {
Serial.begin(115200);
if (!accel.begin()) {
Serial.println(“No ADXL345 detected”);
যখন (1);
}
accel.setRange(ADXL345_RANGE_4_G);
}
অকার্যকর লুপ() {
sensors_event_t e;
accel.getEvent(&e);
Serial.print (e.acceleration.x);
Serial.print(“,”);
Serial.print(e.acceleration.y);
Serial.print(“,”);
Serial.println(e.acceleration.z);delay(55); // ~18 Hz
}
Set Up Edge Impulse

Step 6: Connecting to Edge Impulse
- Close Arduino Serial Monitor.
- Run the command: edge-impulse-data-forwarder –frequency 18
- Enter axis names: accX, accY, accZ
- Name your device: Arduino-Cricket-Board
- Confirm connection in Edge Impulse Studio under ‘Devices’.


ধাপ ৩: তথ্য সংগ্রহ
In Edge Impulse Studio → Data acquisition:
– Device: Arduino-Cricket-Board
– Sensor: Accelerometer (3 axes)
- এসample length: 2000 ms (2 seconds)
- ফ্রিকোয়েন্সি: ৫০ হার্জ
Record at least 40 samples per class:
– Cover Drive
– Straight Drive
– Pull Shot Collect Data Exampলেস
কভার ড্রাইভ
Device: Arduino-Cricket-Board
Label: Cover Drive
Sensor: Sensor with 3 axes (accX, accY, accZ)
Sample length: 10000ms
ফ্রিকোয়েন্সি: 18 Hz
Example Raw Data:
accX -0.32
accY 9.61
accZ -0.12
Straight Drive
Device: Arduino-Cricket-Board
Label: Straight Drive
Sensor: Sensor with 3 axes (accX, accY, accZ)
Sample length: 10000ms
ফ্রিকোয়েন্সি: 18 Hz
Example Raw Data:
accX 1.24
accY 8.93
accZ -0.42
Pull Shot
Device: Arduino-Cricket-Board
Label: Pull Shot
Sensor: Sensor with 3 axes (accX, accY, accZ)
Sample length:10000 ms
ফ্রিকোয়েন্সি: 18 Hz
Example Raw Data:
accX 2.01
accY 7.84
accZ -0.63 
Step 8: Impulse Design
Open Create impulse:
ইনপুট ব্লক: টাইম সিরিজ ডেটা (৩ অক্ষ)।
Window size: 1000 ms Window increase (stride): 200 ms Enable: Axes, Magnitude (optional), frequency 18.
Processing block: Spectral analysis (a.k.a. Spectral Features for motion). Window size: 1000 ms Window increase (stride): 200 ms Enable: Axes, Magnitude (optional), keep all defaults first.
শেখার অংশ: শ্রেণীবিভাগ (কেরাস)।
সেভ ইমপালসে ক্লিক করুন। 
Generate features:
স্পেকট্রাল বিশ্লেষণে যান, প্যারামিটার সংরক্ষণ করুন এ ক্লিক করুন, তারপর প্রশিক্ষণ সেটের জন্য বৈশিষ্ট্য তৈরি করুন।

Train a small model
Go to Classifier (Keras) and use a compact config like:
Neural network: 1–2 dense layers (e.g., 60 → 30), ReLU
Epochs: 40–60
Learning rate: 0.001–0.005
Batch size: 32
Data split: 80/20 (train/test)
Save and train the data
Evaluate and Check Model testing with the holdout set.
Inspect the confusion matrix; if circle and up overlap, collect more diverse data or tweak
Spectral parameters (window size / noise floor).
Step 9: Deployment to Arduino
Go to Deployment:
Choose Arduino library (C++ library also works).
মডেলের আকার ছোট করতে EON কম্পাইলার (যদি উপলব্ধ থাকে) সক্ষম করুন। 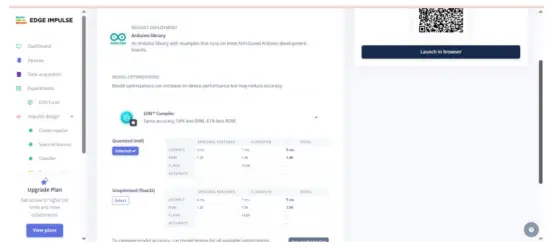 Download the .zip, then in Arduino IDE: Sketch → Include Library → Add .ZIP Library… This adds exampস্ট্যাটিক বাফার এবং কন্টিনিউয়াস এর মতো লেস File → যেমনampলেস →
Your Project Name – Edge Impulse. Inference sketch for Arduino UNO EK R4 WiFi + ADXL345.
Step 10: Arduino Inference Sketch
#অন্তর্ভুক্ত
#include <Adafruit_ADXL345_Unified.h>
#include <your_project_inference.h> // Replace with Edge Impulse header
Adafruit_ADXL345_Unified accel =
Adafruit_ADXL345_Unified(12345);
static bool debug_nn = false;
অকার্যকর সেটআপ() {
Serial.begin(115200);
while (!Serial) {}
if (!accel.begin()) {
Serial.println(“ERROR: ADXL345 not detected”);
যখন (1);
}
accel.setRange(ADXL345_RANGE_4_G);
}
অকার্যকর লুপ() {
float buffer[EI_CLASSIFIER_DSP_INPUT_FRAME_SIZE] = {0};
for (size_t ix = 0; ix < EI_CLASSIFIER_DSP_INPUT_FRAME_SIZE; ix +=
3) {
uint64_t next_tick = micros() + (EI_CLASSIFIER_INTERVAL_MS *
1000);
sensors_event_t e;
accel.getEvent(&e);
buffer[ix + 0] = e.acceleration.x;
buffer[ix + 1] = e.acceleration.y;
buffer[ix + 2] = e.acceleration.z;
int32_t wait = (int32_t)(next_tick – micros());
if (wait > 0) delayMicroseconds(wait);
}
signal_t signal;
int err = numpy::signal_from_buffer(buffer,
EI_CLASSIFIER_DSP_INPUT_FRAME_SIZE, &signal);
if (err != 0) return;
ei_impulse_result_t result = {0};
EI_IMPULSE_ERROR res = run_classifier(&signal, &result,
debug_nn);
if (res != EI_IMPULSE_OK) return;
for (size_t ix = 0; ix < EI_CLASSIFIER_LABEL_COUNT; ix++) {
ei_printf(“%s: %.3f “, result.classification[ix].label,
result.classification[ix].value);
}
#if EI_CLASSIFIER_HAS_ANOMALY == 1
ei_printf(“anomaly: %.3f”, result.anomaly);
#এন্ডিফ
ei_printf(“\n”);
}
আউটপুট প্রাক্তনampLe:
 টিপস:
টিপস:
EI_CLASSIFIER_INTERVAL_MS কে আপনার ডেটা ফরওয়ার্ডার ফ্রিকোয়েন্সির সাথে সিঙ্কে রাখুন (যেমন, 100 Hz → 10 ms)। এজ ইমপালস লাইব্রেরি আপনার ইমপালস থেকে স্বয়ংক্রিয়ভাবে এই ধ্রুবক সেট করে।
যদি আপনি ক্রমাগত সনাক্তকরণ (স্লাইডিং উইন্ডো) চান, তাহলে ধারাবাহিক প্রাক্তন থেকে শুরু করুনampEI লাইব্রেরির সাথে অন্তর্ভুক্ত এবং ADXL345 রিডগুলিতে অদলবদল করা।
We will be adding video tutorials soon; till then, stay tuned – https://www.youtube.com/@RobuInlabs
And If you still have some doubts, you can check out this video by Edged Impulse: https://www.youtube.com/watch?v=FseGCn-oBA0&t=468s
![]()
দলিল/সম্পদ
 |
Arduino ABX00087 UNO R4 WiFi Development Board [পিডিএফ] ব্যবহারকারীর নির্দেশিকা R4 WiFi, ADXL345, ABX00087 UNO R4 WiFi Development Board, ABX00087, UNO R4 WiFi Development Board, WiFi Development Board, Development Board, Board |